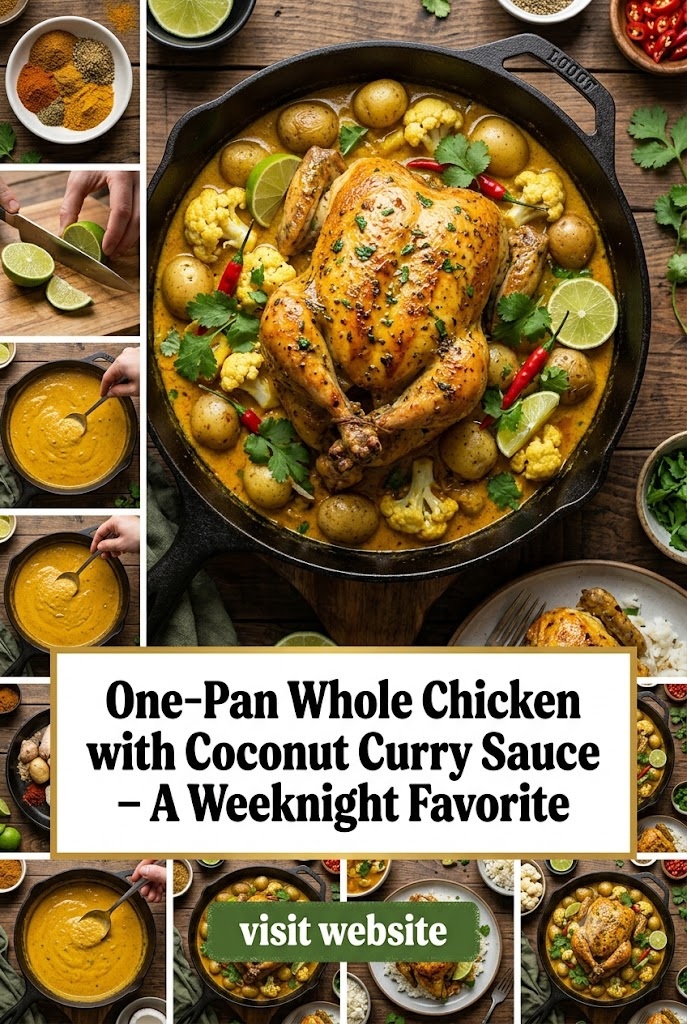
One-Pan Whole Chicken with Coconut Curry Sauce – A Weeknight Favorite
In the fast-paced world of modern living, the “holy grail” of home cooking is a meal that looks like a gourmet feast, tastes like it spent hours simmering in a high-end restaurant kitchen, but requires minimal cleanup and effort. Enter the One-Pan Whole Chicken with Coconut Curry Sauce. This dish is not just a recipe; it is a strategic approach to weeknight dining that balances the rustic comfort of a traditional roast chicken with the vibrant, exotic aromatics of Southeast Asian cuisine.
When you bring a whole, golden-brown chicken to the table, nestled in a bubbling pool of creamy, spiced coconut sauce, you aren’t just serving dinner—you’re creating an experience. This comprehensive guide will walk you through every nuance of this dish, from the science of the perfect crispy skin to the aromatics that make the sauce legendary.
Why the One-Pan Method is a Game-Changer
The beauty of the one-pan method lies in the synergy of ingredients. In a traditional setup, you might roast a chicken in one pan and cook a sauce in a separate saucepan. By combining them, you allow the chicken drippings—often called “liquid gold”—to render directly into the curry base. This infuses the coconut milk with an incredible depth of savory flavor that you simply cannot achieve with store-bought broth alone.
Furthermore, the cleanup is a dream. One heavy-duty skillet or Dutch oven is all that stands between you and a clean kitchen. For the busy professional or the parent juggling a dozen tasks, this efficiency is priceless.
The Anatomy of the Perfect Bird: Choosing and Prepping Your Chicken
The success of this dish begins at the butcher counter. For a one-pan roast, you want a chicken that is large enough to feed a family but small enough to cook evenly without the outside drying out.
1. Size Matters
Aim for a bird between 3.5 to 4.5 pounds. A massive 6-pound roaster will take too long to cook, potentially causing the coconut sauce to break (separate) or scorch before the meat is done.
2. Room Temperature is Key
Never put a cold chicken straight into a hot pan or oven. Take the chicken out of the refrigerator at least 30 to 45 minutes before cooking. This ensures the muscles are relaxed and the meat cooks evenly throughout.
3. Dry the Skin
The biggest enemy of crispy skin is moisture. Use paper towels to pat the chicken completely dry—inside and out. For an even better result, leave the chicken uncovered in the fridge for a few hours prior to cooking to let the skin “air dry.”
4. To Truss or Not to Truss?
Trussing (tying the legs together with kitchen twine) creates a more uniform shape, which helps the chicken cook more evenly and prevents the tips of the drumsticks from burning. It also makes for a more beautiful presentation.
The Flavor Profile: Deconstructing the Coconut Curry Sauce
What elevates this from a simple roast to a “Weeknight Favorite” is the sauce. It is a fusion of Thai and Indian influences, designed to be creamy, tangy, and subtly spicy.
The Creaminess: Coconut Milk
Always use full-fat canned coconut milk. “Lite” versions lack the viscosity needed to coat the chicken and will often become watery in the oven. The fat in the coconut milk also acts as a carrier for the fat-soluble flavors in the spices.
The Base: Aromatics
- Fresh Ginger: Provides a sharp, peppery bite.
- Garlic: The foundation of all savory depth.
- Shallots: Sweeter and more delicate than onions, they melt into the sauce.
- Lemongrass (Optional): Adds a citrusy, floral note that cuts through the richness of the coconut.
The Spice: Curry Paste vs. Powder
For this recipe, a Red Thai Curry Paste is highly recommended. It contains chilies, galangal, and shrimp paste (or vegan alternatives), providing an instant complexity. If you prefer a more earthy, Indian-inspired profile, a high-quality Madras Curry Powder combined with turmeric works beautifully.
Essential Kitchen Tools
Before we dive into the ingredients, ensure you have the right tools:
- A 12-inch Cast Iron Skillet or Enameled Dutch Oven: These retain heat beautifully and can transition from the stovetop to the oven.
- Meat Thermometer: The only way to guarantee a juicy chicken is to cook it to exactly 165°F (74°C).
- Kitchen Twine: For trussing.
- Microplane: For grating fresh ginger and garlic into a fine paste.
The Recipe: One-Pan Whole Chicken with Coconut Curry Sauce
Ingredients
The Chicken:
- 1 whole chicken (approx. 4 lbs)
- 2 tablespoons neutral oil (avocado or grapeseed)
- Kosher salt and freshly cracked black pepper
- 1 tablespoon softened butter (optional, for the skin)
The Curry Base:
- 2 tablespoons Red Thai Curry Paste (adjust based on heat preference)
- 1 can (13.5 oz) full-fat coconut milk
- 1 tablespoon fish sauce (for umami)
- 1 tablespoon brown sugar or coconut sugar (to balance the heat)
- 1 thumb-sized piece of ginger, grated
- 4 cloves garlic, minced
- 2 shallots, finely diced
- 1 teaspoon turmeric powder (for that golden hue)
The Vegetables (The “One-Pan” Companions):
- 1 lb baby potatoes, halved
- 3 large carrots, cut into 1-inch chunks
- 1 red bell pepper, sliced into thick strips
- Optional: Snap peas or bok choy (added in the last 10 minutes)
Garnish:
- Fresh cilantro and Thai basil
- Fresh lime wedges
- Sliced red chilies (for the brave)
Step-by-Step Instructions
Step 1: Preheating and Preparation
Preheat your oven to 400°F (200°C). While the oven heats, prep your vegetables and whisk together the coconut milk, curry paste, fish sauce, and sugar in a medium bowl.
Step 2: Searing the Bird
This is a crucial, often skipped step. Place your skillet over medium-high heat with the oil. Season the chicken generously with salt and pepper. Place the chicken breast-side down in the hot skillet. Sear for 5-7 minutes until the skin is golden and starting to crisp. Carefully flip the bird so it is breast-side up.
Step 3: Building the Sauce
With the chicken still in the pan (or briefly removed if you find it easier), add the shallots, ginger, and garlic to the surrounding oil. Sauté for 2 minutes until fragrant. Pour the coconut curry mixture around the chicken.
Step 4: Adding the Vegetables
Toss the potatoes and carrots into the sauce around the chicken. Use a spoon to baste the chicken with a bit of the curry sauce, but leave the very top of the breast clear so the skin can stay crispy in the oven.
Step 5: The Roast
Transfer the entire skillet to the oven. Roast for about 50 to 60 minutes. Every 20 minutes, you can use a bulb baster to pour some of the sauce over the legs and wings, but avoid the breast skin to maintain the crunch.
Step 6: Testing for Doneness
Check the internal temperature at the thickest part of the thigh (without hitting the bone). Once it reaches 165°F, remove the pan from the oven.
Step 7: The Rest
This is the hardest part: wait. Let the chicken rest in the pan for at least 15 minutes. This allows the juices to redistribute back into the meat. If you cut it too soon, the juices will run out, leaving you with dry chicken.
The Science of Flavor: Why This Dish Works
To understand why this dish is so satisfying, we look at the Maillard Reaction and Emulsification.
The initial sear on the stovetop triggers the Maillard reaction—a chemical reaction between amino acids and reducing sugars that gives browned food its distinctive flavor. When the chicken then roasts in the oven, the dry heat finishes the skin, while the bottom half of the chicken effectively “braises” in the coconut milk.
Braising is a moist-heat cooking method that breaks down connective tissues (collagen) in the legs and thighs, making them incredibly tender. By using both roasting and braising techniques simultaneously in one pan, you get the best of both worlds: crispy skin and fall-off-the-bone meat.
Health Benefits: A Nutritious Powerhouse
This isn’t just “comfort food”; it’s “functional food.”
- Turmeric: Contains curcumin, a potent anti-inflammatory and antioxidant. When paired with the healthy fats in coconut milk and the black pepper used on the chicken, the absorption of curcumin is significantly increased.
- Ginger: Known for aiding digestion and reducing nausea.
- Garlic: Supports heart health and the immune system.
- Coconut Milk: While high in saturated fat, it contains medium-chain triglycerides (MCTs), which are processed differently by the body and can provide a quick source of energy.
Customizing Your One-Pan Curry
The versatility of this recipe is what makes it a recurring favorite. You can adapt it to suit your pantry or dietary needs.
For the Spice Lovers
Add two chopped bird’s eye chilies to the aromatics or double the amount of red curry paste. You can also finish the dish with a drizzle of Sriracha or chili oil.
For the Low-Carb/Keto Crowd
Omit the potatoes and carrots. Instead, use cauliflower florets, zucchini chunks, and radishes (which lose their bite and become potato-like when roasted).
The “Green” Variation
Instead of red curry paste, use Thai Green Curry Paste. This will give the dish a more herbaceous, bright flavor. Pair this with green vegetables like asparagus, green beans, or broccoli.
The “Massaman” Style
Add a cinnamon stick, two star anise, and a handful of roasted peanuts to the sauce. This creates a sweeter, warmer, and more aromatic profile typical of Southern Thai cuisine.
Expert Tips for the Ultimate Result
- Don’t Overcrowd the Pan: If the vegetables are piled on top of each other, they will steam instead of roast. Use a large enough skillet so everything is in a single layer around the chicken.
- Use Fresh Lime Juice: The acidity of the lime at the end is non-negotiable. It “wakes up” the heavy coconut milk and balances the saltiness of the fish sauce.
- The “Spoon Test”: If your sauce looks a bit thin at the end, remove the chicken and vegetables to a platter and simmer the sauce on the stovetop for 5 minutes to reduce and thicken it before pouring it over the meat.
- Baste with Caution: Basting is great for flavor, but if you want that “shatter-crisp” skin, stop basting the breast area halfway through the cooking time.
Perfect Pairings: What to Serve Alongside
While the potatoes and carrots make this a complete meal, you may want something to soak up that liquid gold sauce.
- Jasmine Rice: The classic choice. Its slight floral aroma complements the coconut perfectly.
- Coconut Rice: For the ultimate indulgence, cook your rice in a mixture of water and the leftover coconut milk from the can.
- Garlic Naan: Perfect for dipping into the curry.
- Quinoa or Farro: For a nutty, high-fiber alternative that holds its texture against the creamy sauce.
- Crispy Cucumber Salad: A cold, vinegary cucumber salad with red onions provides a refreshing contrast to the hot, rich curry.
Frequently Asked Questions (FAQs)
Can I use chicken pieces instead of a whole chicken?
Absolutely. Use 3-4 lbs of bone-in, skin-on thighs and drumsticks. The cooking time will reduce to about 35-40 minutes. The method remains the same: sear the skin first, then add the sauce and bake.
My coconut sauce separated. What happened?
High heat can sometimes cause coconut milk to “break,” where the oil separates from the solids. This usually happens if the oven is too hot or the chicken is overcooked. While it might look less aesthetic, it is still perfectly safe and delicious to eat. Simply stir it vigorously before serving.
Can I make this in a slow cooker?
You can, but you will lose the crispy skin. If using a slow cooker, cook on low for 6 hours. I recommend searing the chicken in a pan first to get some color, then transferring it to the slow cooker.
How long do leftovers stay fresh?
This dish is arguably better the next day as the spices have more time to meld. Store in an airtight container for up to 3 days. Reheat gently on the stovetop to prevent the chicken from becoming rubbery in the microwave.
Leftover Transformation Ideas
If you have leftovers, don’t just reheat them—reinvent them!
- Curry Chicken Salad: Shred the cold chicken and mix it with a bit of the leftover sauce, some Greek yogurt, chopped celery, and grapes for a vibrant lunch.
- Curry Noodle Soup: Add chicken broth to the leftover sauce, bring to a boil, and drop in some rice noodles and the shredded chicken.
- Curry Wraps: Use large flour tortillas, add the warmed chicken and veggies, some fresh spinach, and a dollop of chutney for a portable meal.
Conclusion: The Joy of One-Pan Cooking
The One-Pan Whole Chicken with Coconut Curry Sauce represents a shift in how we view home cooking. It proves that you don’t need a sink full of dishes or a complicated list of techniques to create a meal that is deeply nourishing and visually stunning.
By mastering the simple art of the sear, the aromatics of the curry, and the patience of the roast, you unlock a recipe that will surely become a staple in your household. It is a dish that invites people to gather, to tear off pieces of warm bread, to drizzle extra sauce over their rice, and to enjoy the warmth of a home-cooked meal that tastes like the world on a plate.
Whether it’s a rainy Tuesday or a celebratory Sunday dinner, this one-pan wonder delivers every single time. Happy cooking!